Hello Learn With Pari family! 👋🎨
Today we’re diving into a squishy, squelchy, super fun DIY adventure – making a cooking pot with clay at home… WITHOUT a pottery wheel! Yes, you heard that right – no fancy tools, just your hands, some natural clay, and a whole lot of creative energy!
And guess who’s helping me? Yup – Mumma (the real MVP), and a little bit of help from my forever curious assistant, my brother Aaynash. 😄
🧱 What You’ll Need
Before we start, let’s gather our magical pot-making ingredients:
- Natural clay (you can get this from a craft store or from clean garden soil)
- A bowl of water 💧
- An old cloth or mat to work on
- A plastic knife or popsicle stick for shaping
- Your super strong and artistic hands 👐
Optional: Apron (because things are going to get messy… and fun!)
🎬 Step 1: Prepping the Clay
First, we kneaded the clay like it was dough for 20 rotis. 😅 It’s important to remove all air bubbles and make the clay nice and soft – or as I like to call it, “squish-a-licious.”
Aaynash kept calling it “mud pizza dough”… until Mumma warned him not to taste it. 😂
🪔 Step 2: The Pinch Pot Method (Easy Peasy!)
No wheel? No problem! We used the pinch pot method, which is super easy and perfect for beginners.
Here’s how:
- Roll the clay into a big ball – about the size of a lemon.
- Use your thumbs to press a hole in the center.
- Gently pinch around the edges to widen and shape the pot.
- Keep smoothing the walls with wet fingers.
💡 Pro Tip: Don’t make it too thin, or it might crack when it dries!
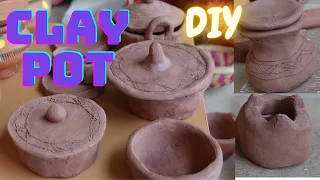
🎨 Step 3: Add a Personal Touch
We got a little creative here! I added a wavy pattern around the rim of my pot. Aaynash made dot-dot designs using a toothpick and said it was “tribal style.” Not bad, bro. Not bad.
Want to decorate more? You can use small beads, buttons, or even leaves to press patterns into the clay. It’s your masterpiece!
⏳ Step 4: Let It Dry
Now it’s time to let the pot rest. Just like us after a long school day. 😴
We placed our pots in a cool, shady spot and let them dry for 1-2 days. (Don’t dry in the sun too fast or it might crack!)
📺 Coming Up in Part 2…
Stay tuned for Part 2, where we’ll:
- Smooth and finish the pot
- (Maybe) paint it 🎨
- Try a mini cooking experiment in it! 🔥🍲
Will the pot survive the heat? Will our clay cooking adventure be a success or a soggy mess? You’ll have to wait and see!
💬 Try It at Home!
Making a clay pot at home is not just fun, it also teaches patience, creativity, and how awesome it feels to make something with your own hands. Share your creations with us using #LearnWithPari – and maybe we’ll feature your pot on our website!
Happy potting (and laughing),
Pari 🌸